Saturday, November 13, 2021

A Treatise on Traps

 This post is available in video form on my YouTube channel (opens in a new window).


 Click to enlarge


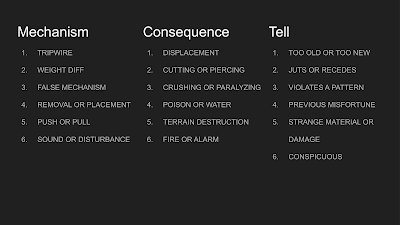
Here is a simple 3d6 table to generate traps. Each trap has three basic characteristics: the mechanism, the consequence, and the tell.


The mechanism is how the trap is activated. Referees should interpret these results loosely; for example, “weight differential” could mean an Indiana Jones-style trap where removing an idol from a plinth releases a boulder, or it could be a rickety bridge that will collapse if a PC is over a certain level of encumbrance. False mechanisms could mean fake doors that fall and crush anyone attempting to open them, or chest mimics that chomp greedy treasure hunters.


Consequences are self explanatory. Be creative in how you approach them, a “crushing” trap might cause rocks to fall on PCs, or it might mean that their hand is maimed if they reach into a cubby. Displacement traps can be stairs that turn into chutes, portcullises that split parties from one another, or even magical teleport traps.


The “tell” is how a PC can be expected to figure out that something is trapped. For example, “too old or too new” might be a row of canopic jars, which when inspected will reveal that one of the jars is free of any dust. The jar is actually a trap set to ward against tomb robbers that will release ghosts when opened. When the referee chooses to reveal the tell depends on the experience of the players and the consequences of the trap (deadly traps should generally be more obvious, unless dealing with an experienced group). For a first session, or for the first trap in a dungeon, the referee might immediately warn players that, for example, there are holes in the walls of this hallway (indicating a dart or poison gas trap). For more experienced players, the referee might simply note that vines grow up the walls in this hallway, and leave it to players to carefully inspect the vines and notice the holes hidden behind them.


I approach hiding and revealing traps by taking inspiration from the old text-based computer adventure games like Zork, where I’ll describe very simply the notable features of a room, which appendix I in the AD&D DMG is invaluable for. If players more carefully inspect and interact with these features, I will give them more clues. For a particularly devious trap, I might obfuscate it under multiple layers; for example, a player might wish to inspect a conspicuously expensive tapestry. If they peek behind it, it reveals an unworked stone wall, and inspecting that unworked stone reveals that it has been knocked down and built back up many times, indicating perhaps a boulder or log trap hidden behind the wall, confirmed by damage to the opposite wall and bits of stone scattered about the room. The point is to force players to use context clues and lateral thinking to reveal the nature of the trap. There might also be multiple clues leading to the same trap, for example the stone scattered about the room in the previous example.


As for how players can thwart traps, I find it’s best to simply leave it up to the players. More often than not they will come up with an ingenious way to disarm or avoid the trap that you would never have thought of yourself, and it saves on prep work for you. Having one and only one way to avoid a trap can lead to a frustrating experience for the players as they try to divine your thought process.


Placement of traps is also crucial. Traps can be fun and exciting, and a dungeon might be dull without them and encourage recklessness. However, too many traps can result in players being afraid to interact with a single feature of your dungeon and slow the pace of the game to the point where it is boring and frustrating. Using wandering monster rolls to force players to move at a decent clip will further frustrate them when they are forced by the clock to blunder into a trap. To encourage player agency in deciding how and when to check for traps, referees must be logical in their placement of those traps. Defensive choke points may be trapped, as well as treasure rooms. In my opinion, it’s more fun for players to thwart a trap they know about than to find a trap they didn’t know about. I usually signal by following the old rule: if it’s too good to be true, it probably is. When my players find a golden statuette atop a plinth that’s surrounded by dried bloodstains, they know to carefully inspect every feature of the room.


Trapping too many mundane rooms can lead to a boring arms race between the referee and the player: last room we entered, a slime fell on us from above, so now we note that we’re always checking the ceiling when we enter. To thwart the players, the referee places a pit trap. Now we’re always checking the ceiling AND prodding the ground with our ten foot pole. Then the referee places a crossbow trap in the next room that fires when the door is opened. Now we specify that we stand to the side of the door when we open it AND we check the ceiling before entering AND we prod the floor with our poles. Well, now the referee electrifies a door handle. Now we put a rag over the handle before we open it AND we stand to the side AND check the ceiling AND prod the floor and and and… for sixty rooms. This is a waste of time! Even though traps are a negative experience for the characters, they should be a positive experience for the players! I cannot stress this enough. My players have fun discovering, thwarting, and even sometimes getting caught by the traps I place in my dungeon, because they are placed in a fair and logical manner that doesn’t make them afraid to walk down any ten-foot stretch of hallway without first tediously checking for traps. Think of traps like the “inverse” of puzzles: rather than solving a problem for a reward, they are solving a problem to avoid a consequence. But the fun of it, for the players, is in the problem-solving! Not in arbitrarily being taxed resources for simply exploring the dungeon, which is what should be encouraged in the first place. While recklessness should be curtailed, exploration and interaction is the point of the game!


If traps can be detected and evaded by interaction, what’s the point of rolls? In my home games, we rarely roll to detect or remove traps. In a strict interpretation of the rules, a thief’s chance to find or remove traps is for small, mechanical traps such as a poison needle trap in a lock, essentially traps that are difficult to detect or disarm by interacting with the world. Regardless, I find myself using less of these types of traps and therefore encroaching on the thief’s design space a bit, so I suggest giving the thief some buffs here and there to even it out.


I encourage you to roll on this table a few times and post any traps you come up with in the comments. On the screen are a few examples from myself. You can also create your own tables to generate unique traps, and I’d love to see any you come up with yourself, so please post them in the comments as well. Thank you for watching!

Saturday, September 25, 2021

Cave Generator

Here is a cave generator I made, for use in your hexcrawl campaigns.

To generate a cave, first draw an entrance tunnel 30-60 ft in length. Then, roll a d20/d12/d10 for a large/medium/small cave system as well as a d6 and consult the following table. I recommend using 10sq/in graph paper for a large cave system.

Click to enlarge.

  There is also a sub-table for Chambers:

 Click to enlarge.

I will explain things roughly in the order they appear, first for the main table and then for the chamber sub-table, unless I feel they are self-explanatory:

  • Tunnels narrow on a roll of 1 on a d6 and widen on a roll of 6. In a normal cave tunnel, two man-sized beings can walk abreast and upright. After narrowing once, it may only be passed through one abreast. After narrowing again, man-sized creatures must crawl on their hands and knees. Armor and backpacks will make this more difficult. Narrowing a further time means that only a halfling-sized character wearing no armor or backpack can squeeze through on their belly, and must save vs. paralysis or become stuck (lethal).
  • The d12 rolled to determine a curving passageway uses a "clock face" system. If the direction indicated by the d12 is back the way the party came, the passageway does a hairpin turn. If the direction indicated by the d12 is the way the party is currently going, the passageway does two tight hairpin turns to form an "S" and continues in the direction it was originally going.
  • A gentle slope is a mere feature of the cave and will not bring characters to a new level, unless it continues for 120ft. or longer.
  • For a chamber, roll the d20/d12/d10 twice to determine its width and height, taking note of how many exits there are (for example, rolls of 3 and 10 would mean a chamber 30ft by 40ft with two exits). Roll a d12 to place the exits around the chamber (which are generally round). If an exit should be placed where an exit already is, that exit is now hidden (e.g. it is a small crack in the wall that can be found and squeezed through, hidden behind a stalagmite, & c.)
  • When stocking a chamber, "faction" indicates the monster or type of monster whose lair it is, if applicable. Otherwise, use the wandering monster table. Here is an example of a wandering monster table appropriate for caves:
      1. Beetle, Fire
      2. Dwarf
      3. Goblin
      4. Green Slime
      5. Kobold
      6. Lizard, Gecko
      7. Orc
      8. Shrew, Giant
      9. Skeleton
      10. Snake, Cobra
      11. Spider, Crab
      12. Faction

Saturday, March 20, 2021

How to Hexcrawl

This information can be found in video form here. The video goes into more depth with more examples and visuals.


PREPARATION

You will need:

  • A one-inch three-ring binder
  • Clear plastic insert sheets
  • Graph paper, about 4sq/in.
  • Some hex graph paper (available for free online, around 15 hexes by 18 hexes is fine for your first map)*
  • Colored pencils
  • Pen
  • Pencil
  • Wet-erase marker

 An invaluable resource is Judges' Guild's 1977 "Wilderlands of High Fantasy" but it is not strictly necessary.

SETUP

    1. Set up a calendar section in your binder. On one page, list six months with space in between them (can put six months on the back as well for a full year). Write down future events as necessary. On the next page, list the month at the top and write down the days going vertically, as well as a column for weather and a column for weekdays. Generate weather using your preferred method beforehand. Next to the days, note any upcoming events. Check days off as they pass.

     2. Have some tables to generate hex features on the fly. "Wilderlands of High Fantasy" has some fantastic tables for this, but you can also make your own or pull them from blogs. I use a broad table to determine if a feature is natural, manmade, or magical in nature, and sub-tables to determine the feature itself (e.g. a hollow tree, a ruins, a fairy ring)

    3. One two-page "spread" should be composed of your hexmap and its key. The spread before that can be your random encounter tables (X57 and X58 in Moldvay Expert, or your own).

    4. Use colored pencils to make terrain on your hexmap, and a pen with black ink to show rivers. Dashed lines are roads, and dotted lines are trails (or whatever makes sense to you). Six miles per hex is the standard we will be using.

    5. Put numbers in your hexes for features, and write the associated feature on your key in a numbered list.

    6. If a feature requires more description (including a map), insert a page after your key, write the number of the feature on it, and describe the hex. In this way you may insert hexes as they are fleshed out, which is why a three-ring is superior than a marble notebook.

    7. Create a rumor table regarding the features on your hexmap.

MOVEMENT

  • The players have "movement points" equal to their miles per day divided by how many miles each hex is. E.g.: 18mi/day movement and 6mi hexes = 3 movement points.
  • Each hex costs a number of movement points to move INTO.
    • Clear terrain (plains, farmland) = 1 point
    • Rough terrain (forest, hills) = 2 points
    • Very rough terrain (swamp, mountains) = 3 points
  • ONE point may "roll over" to the next day (if players end the day with one movement point left over, they have one additional movement point to use the next day)

TAKING A TURN

  1. Describe the players' surroundings (features in the hex and the terrain of the surrounding hexes)
  2. Players decide on a direction
  3. Check for lost chance (d12):
    1. Veer 60 degrees clockwise
    2. Veer 60 degrees counter-clockwise
    3. Veer 120 degrees clockwise (only in rough and very rough)
    4. Veer 120 degrees counter-clockwise (only in rough and very rough)
    5. Move backwards 1 hex (only in very rough)
    6. Lose a day of travel (only in very rough)
    7. - 12. No change.
  4.  Check for encounters
    • X-in-6: 1 for clear, 2 for rough, 3 for very rough
    • Check encounter time: morning (hex they start in), noon (halfway through their movement points), evening (hex they end in), night (hex they end in, spellcasters cannot prepare spells the next day).
    • Check "% in Lair", if Lair, generate Lair and add to key
  5. Moving into a featureless hex = 1-in-20 chance to generate a feature
  6. Describe surroundings again and continue to move players until movement points are exhausted, then begin a new day (check off a day on your calendar). ONLY CHECK FOR LOST/ENCOUNTERS PER DAY, NOT PER MOVE
  • Track movement using wet-erase marker on plastic sleeve
  • Eschew lost chance if navigating using rivers to navigate or terrain is familiar
  • Remember that combat scale is in yards, not feet, in the wilderness
  • Check for follower morale if extremely demoralizing things happen. Failing by a great margin might result in mutiny.

FINDING HIDDEN FEATURES

    Players may spend movement points to have an X-in-Y chance of finding a feature, where X is movement points spent and Y is 6 for clear terrain, 8 for rough terrain, and 10 for very rough terrain. Hunting may be done in the same way, with 6/8/10 being for teeming with wildlife / normal / sparsely populated rather than terrain roughness. If found, generate a feature perhaps with some treasure and add it to the key. Some features may be pre-generated and decided to be hidden and keyed on the map. These features should generally have rumors leading to them, and some reward for finding them.


*NB this is about one-sixth of the size of the original Outdoor Survival map, about 45x36 hexes.

Saturday, August 15, 2020

Generating and Advancing a Church

Churches are primarily a method for players to acquire healing and restorative services that may otherwise be beyond their ability. They may also be a place for players to hire low-level clerics as henchmen. However, churches may also be a place for players to spend treasure in return for perks, and strengthen players' relationship to their town. This is not only an immediate benefit for players, but also serves as a "gold sink" and a place for players to spend their treasure.

What follows is mere suggestion. The core mechanic is to attract more powerful clerics to lead churches by donating gold. Cleric scrolls, holy orders, and artefacts are options to "flesh out" advancement of religious institutions.

Consider the following table:

Click to enlarge.

Level is merely an abstraction for the Referee. A typical town will have a church in the range of level 3-5. Level 6 churches will probably be reserved for the capitals of major cities, and a level 7 church may well be the seat of religious power in an entire county.

Title is a suggestion and may be ignored, as any title is an acceptable way to refer to such religious institutions (e.g. in this article I will use "Church" as a generic term.)

Donations is the value in GP which players must give freely to the church (i.e. NOT in exchange for goods and services) before a leader is attracted (qv.) - these values, unlike XP, are NOT cumulative! E.g. if players donate 12,000gp to turn a Temple into a Church, they will need another 25,000gp in donations to turn that Church into a Basilica, NOT 13,000gp!

A leader is an NPC cleric who will be attracted within 2d4 months of reaching the minimum donations value to attain the next level. He will bring with him any cleric scrolls, holy orders, and artefacts as commensurate with level (qv.)

Any given institution will have cleric scrolls with cleric spells on them. These scrolls are not for sale and are prized relics, not for use.

Holy orders are troops (0-level militiamen) that can be raised in defense of the church. One in ten troops will be a cleric two levels lower than the current leader.

Artefact attracted is a yearly chance for a magic item (weapon, armor, or otherwise holy relic) to be recovered or sent to the church. This item is stored in a church's reliquary, which is usually heavily guarded. Use this same percentage chance to check and see if a leader has an artefact with him when he is first attracted to the church. Like scrolls, these artefacts will rarely be given willingly, even for exorbitant sums of money.

Churches will have half of their donations in wealth as cash (or expensive plates, gems, gold-trimmed robes and mitres, baculi, & c.); the other half will be put into improving the facilities, e.g. stained-glass windows, organs, bell towers, statues, & c.

A church of significant standing may also house a mausoleum for the noble families of the town or city.

The leader of the church will perform clerical spells for a price. The following chart is a suggestion as to the spells available, frequency, and price. Note that spells are cumulative, i.e. a Vicar will also offer level-1 spells such as Cure Light Wounds.

Click to enlarge.

EXAMPLE:

The town of Fresh Water has a small cobblestone temple to St. Katharine, overseen by the Vicar, Edmond. A party of adventurers donates 12,000gp to the church. The referee rolls 2d4 and finds that it will take 4 months for a new leader to be attracted. In the meantime, the temple to St. Katharine installs stained glass windows and purchases an organ, worth a total of 6,000gp. After 4 months, the Curate Theodore arrives in Fresh Water to preach at the newly renovated Church of St. Katharine. He has with him a retinue of 12 men, one of whom is an acolyte, and three Holy Pages (cleric scrolls). The referee checks to see if Theodore has brought a holy artefact with him, but finds that he does not. The referee checks to see if the Church of St. Katharine attracts a holy artefact this year, and also finds that it does not.

After a few more months of adventuring, the players have donated an additional 25,000gp to the Church of St. Katharine, and the referee again rolls 2d4 and finds that an Elder will come to the Church in a mere 2 months! When the Elder Dominicus arrives, masons are hard at work adding an entire new wing to what has now come to be known as the Basilica of Holy Katharine. Dominicus brings with him an additional six scrolls and a retinue of 50 men, 5 of whom are acolytes. Dominicus is a powerful cleric and can not only Bless and Cure Light Wounds as can Edmond and Theodore, but also Cure Diseases and Remove Curses, although he will only perform these services monthly, and for a hefty fee of 10,000gp per cast. Again, the referee determines that Dominicus has not brought an artefact with him; however, the referee does determine that the Basilica of St. Katharine does attract an artefact this year. He rolls a d12 and finds that it will come in 5 months and notes as such on his calendar. Five months later, an epopt arrives bearing a +1 mace (+3 against undead) in a jeweled case - the legendary mace of Roche, thought to be lost in a crusade 200 years ago.

Monday, August 3, 2020

RETAINER RULES: AN EXPLANATORY TALE

Confused by retainer rules, I wrote something to help myself keep the categories straight. I hope you find it helpful.

  • RETAINER: A general term for any NPC who a PC has hired. Retainers usually fall into three broad categories: HIRELINGS, SPECIALISTS, and MERCENARIES
    • HIRELING: A hireling will follow PCs on dungeon and wilderness adventures. Hirelings will demand a base pay rate, and if expected to go into a dungeon, will also demand a share of treasure.
    • SPECIALIST: A specialist will not follow PCs on adventures, and depending on the type of specialist, will demand payment per job or monthly. Rarely, a specialist may agree to enter a dungeon only if safe passage is guaranteed.
    • MERCENARY: A mercenary will follow PCs on wilderness adventures, but will not enter dungeons. Mercenaries will demand monthly pay rates, and those rates are doubled in times of war or if being sent into battle.

NB: By AD&D terms, "Hireling" is a more general term that refers to any NPC a PC has hired, while "Henchman" refers to those employed who will enter dungeons and fight.   

EXAMPLES:
Ulf the Fighter is exploring a flooded catacombs a half-day's ride to the east. He needs someone to watch his mount, as it refuses to descend the steep stairs to enter the dungeon with him. He hires Bob at a base pay rate of 1gp per day to ride out with him and watch his mount while he is exploring the catacombs. Because Bob is not expected to follow Ulf into the dungeon, he is not guaranteed a share of treasure.

While exploring the catacombs, Ulf is surprised by a pack of skeletons. He barely escapes with his life, and resolves to hire an acolyte to help him deal with the undead. He hires Alice the Acolyte at a base pay rate of 5gp per day to ride out with him and Bob and explore the catacombs with him. Because Alice is expected to fight, he offers Alice a 25-75 split of any treasure found. Alice counter-offers an even split, to which Ulf agrees. Ulf also must outfit Alice for the journey, and pays for rations, a mount, chainmail, a shield, some holy water, some torches, a sling, and a mace. At the last second, Ulf decides to outfit Alice with a suit of plate armor instead of chain mail, for which Alice is grateful. Alice, Bob, and Ulf ride out to the catacombs and Bob watches the horses while Alice and Ulf explore the catacombs. They dispatch the skeletons and recover an amulet worth 1600gp. Upon returning to town, Ulf gains 800xp (1600xp split between two people) and Alice gains 400xp (50% of 1600/2, as Alice is a hireling she only gains half a share of XP). Ulf is able to sell the amulet at the local moneychanger for 1,050gp. He gives Alice 550gp, even though he only owes her 525gp per their agreement. This tip pleases Alice, and considering he also paid for a suit of full plate, she is eager to adventure with Ulf again.

Months later, Ulf has conquered the catacombs, with the exception of an unexplored room sealed behind a large metal door with a complicated lock. Ulf has also recovered a locked iron chest from the catacombs which he has been unable to open. He resolves to hire the town locksmith to open the chest for him, and to ask if the locksmith will also help him with the door in the dungeon. The locksmith agrees to open the chest for Ulf, asking for 50gp and half of whatever is found in the chest. Ulf refuses, offering 75gp. The locksmith says that his usual rate is 100gp per job, and Ulf agrees. After opening the chest (some potions and scrolls are within), Ulf asks the locksmith if he would agree to opening the door deep within the dungeon. Although Ulf has conquered most of the dungeon, the locksmith refuses, as the door is far too deep in the dungeon for him to agree. Ulf proposes that he dig a tunnel directly to the door, bypassing most of the dungeon, and the locksmith says that if Ulf accomplishes this, the locksmith will pick the lock for ten times his normal rate - 1,000gp.

Ulf then sets out to dig a tunnel from the first floor of the dungeon to the fourth, where the door is. He shows up to the dwarven miners' guild and explains his situation, asking to hire a team of dwarven engineers. Ulf's accurate dungeon map allows the guild to estimate that the job will take two months for a team of five to complete. As the miners are journeymen of the guild, they charge quite a hefty fee: 1,000gp per dwarf per month! They also demand that their base camp be protected by a team of mercenaries, so they don't have to fear the roving bands of wolves and barbarians that patrol the wilderness outside the catacombs. Ulf reluctantly agrees, and sets out to hire mercenaries, mourning the 10,000gp he is going to have to spend to dig such a tunnel.

Ulf hires thirty men: Fifteen pikemen in leather, ten crossbowmen in leather, and five medium horse, mounted and clad in chain.
  • Pikemen: 3gp/month x 15 = 45gp/month
  • Crossbowmen: 2gp/month x 10 = 20gp/month
  • Medium horse: 4gp/month x 5 = 20gp/month
The mercenaries cost him a total of 85gp per month, so he expects to pay 170gp for the two-month job. He also hires a team of porters to set up the camp for the dwarven miners: ten porters, hired for a week, comes out to two and a half gp while the camp is set up.

After a month, war breaks out in the east! The mercenaries re-negotiate their contract (as they are now in high demand), and Ulf winces as he must pay them double their rate for the second month. In total, he will have spent 255gp on his mercenaries over two months. The dwarves, who have been kept happy and productive with a steady supply of barrels of ale that Ulf has been hiring carters to bring to the camp, finish their job a week early, and Ulf need only pay them three quarters of their monthly rate for the second month (he keeps the mercenaries on-hand for the extra week as he enjoys the addded protection). At long last, Ulf can attempt to open the metal door!

The locksmith, paid 500gp in advance and escorted by Ulf and a team of hirelings, enters the tunnel and sets to work opening the lock. Rejoice - behind the door is the treasure rooms of the catacombs! Gold and jewels are stacked in piles to the ceiling - a veritable kings' ransom. The hirelings Ulf has brought with them are struck by greed, and begin stuffing their bags with as much treasure as they can carry, even though they were not promised a share of treasure, as escorting the locksmith through empty tunnels was judged to be a particularly safe venture. Enraged, Ulf cuts them down. He stuffs their bodies into some empty coffins in the catacombs, and thrusts a sackful of jewels (worth far, far more than the remaining 500gp he owes him) into the hands of the locksmith. "Terrible business," Ulf says, "that treasure being magically trapped, eh?" The locksmith gets Ulf's drift, and mutely nods.

For the next seven days, Ulf carefully tabulates the treasure in the room and hires a team of porters to help him carry it back to town. One of the porters was caught nicking silver he thought wouldn't be missed, and Ulf takes his left hand in front of the other porters. No problems with thievery after that.

With his riches, Ulf purchases a large estate. He permanently employs a team of mercenaries to patrol his lands and keep them safe, paying them their base rate. Occasionally, he must put down a rebellion by his more recalcitrant vassals, and doubles the rate at which he pays his mercenaries as he sends them to battle. He dies in his sleep at the ripe old age of 78, having sired many sons.

Sunday, August 2, 2020

Generating an Inn

In the previous article, I wrote about generating a town roughly analogous to the town found in T1: The Village of Hommlet. This is a guide to creating an inn and tavern.

An inn will have another d4 employees in addition to whatever employees are rolled as a "wealthy house." (see previous article)

In addition to the treasure rolled as a "wealthy house," which is stored in the innkeeper's private room, there will be 1d100 each of copper, silver, gold, and electrum as well as d20 pieces of platinum "on hand." This number represents cash on hand during a busy night, so there will be less in the mornings, as cash is usually taken and deposited in the innkeeper's private room at the end of each night. The innkeeper's quarters is not counted among the private bedrooms for rent.

An Inn generally has about eight private bedrooms, in addition to a suite, dormitory, and spare room where employees may sleep. Larger inns will have more, while smaller inns will have fewer.

Dormitories will have 2d6 occupants in them and can hold up to about 12 people. They are generally first-come, first-serve, so grab a bed before you're forced to sleep in the stables!

About half of the rooms in an inn will be taken up by guests: 3-in-4 chance of one guest, 1-in-4 chance of two. One in four occupied rooms will have wealthy occupants. If a suite is occupied (special 1-in-6 chance), the occupant(s) is always wealthy. Change out these occupants every week or two. Wealthy occupants may stay longer, or anyone interested in faction politics.

Regular occupants typically will have about 100GP per HD and a chance for gems, jewelry, and magic items commensurate with Treasure Type U (5% 1d4 gems, 5% 1d4 jewelry, 2% 1 magic item).

Wealthy occupants, who generally have more than 1 HD (add 1d6 HD), will typically have about 1,000GP per HD and a chance for gems, jewelry, and magic items commensurate with Treasure Type B (25% 1d6 gems, 25% 1d6 jewelry, and 10% 1 magic sword, suit of armor, or weapon). Wealthy occupants should nearly always take an interest in faction politics. Extremely wealthy and powerful occupants may travel with a personal bodyguard.

Neither wealthy nor regular occupants typically carry great amounts of cash on them, and treasure indicated by their roll will usually be found in the form of gems, rings, and other pieces of treasure that are easy to conceal and carry. These items will be well-hidden, and wealthy occupants may even trap their cache.

All guests are armed as indicated in the previous post. Some guests may be wizards, clerics, or demihumans as the referee desires, and will be equipped thusly. Wealthy fighting-man occupants typically have chain armor or better.

Below is a generic cost sheet for inns and taverns; it may be adjusted to your liking.

Click to enlarge.

Saturday, July 25, 2020

Generating a Keyed Village

Having spent the last few weeks poring over T1: The Village of Hommlet, here is a method to generate generic households in a village. These are appropriate for farmers, wainwrights, cabinetmakers, & c. I have done the math and the houses generated thusly will be mostly in line with what one would find in T1.

Step One:

Roll three different-colored d6 dice and two different-colored pairs of d8 dice (3d6+4d8)

Each house has...
  • A 4-in-6 chance of having d6 children 
  • A 1-in-6 chance of having d3 dogs
  • A 1-in-6 chance of being wealthy
Wealthy houses roll on a special treasure table and are generally the houses of moneychangers, traders, nobles, and clergy. For now, simply mark these houses with a '$' symbol. See step four.


Consult this 2d8 table to see how many adult men and women are in the household:

Step Two:

Stock the house with treasure and find a place to hide it. NB: Gems and jewelry are assumed to have values given on page B47 of Moldvay Basic. Gems and jewelry can have an unassigned value until recovery, if the Referee desires.

Click to enlarge.

Click to enlarge.

Step Three:
    
Arm the fighting-aged men. Roll a d4, d6, d8, d10, d12, and d20. Each fighting-aged man in chain has a 1-in-6 chance of having +1d4 HD.
Click to enlarge.

Step Four:

Using your wealthy houses, assign the following roles:
  1. Nobility
  2. Inn
  3. Clergy
  4. Moneychanger
  5. Merchant
Any leftover wealthy houses are also merchants (4-in-6), heads of guilds or minor nobility (1-in-6), or otherwise extremely skilled craftsmen (1-in-6). Depending on the governmental structure of your village, these wealthy individuals may hold pull with the nobility. There should generally be no more than five to ten wealthy houses, depending on the size of your town.

There is typically only one moneychanger per town. If there are multiple churches due to your milieu being polytheistic, split the treasure somewhat evenly between them.

IN ADDITION TO their normal treasure rolls, wealthy houses also roll on the following treasure table:
  • d6 x 1,000 gp
  • d4 x 100 pp
  • d6 HIGH-VALUE gems (these gems are worth d6x200gp ea)
  • 75% chance of d4 pieces of HIGH-VALUE jewelry (worth d6x1,000gp ea)
  • 10% chance any two magic items
The town moneychanger will have twice this amount, and a store of at least 1,000 cp, sp, and ep (convert gold into these rather than in addition to treasure already generated)

A merchant will have half this amount, rounded down (10% chance of any ONE magic item, and usually not for sale).

The majority of gp in a wealthy house will not be cash, but rather paintings, expensive silverware, luxurious rugs, rare spices. Cash and gems are always hidden away. Churches typically have wealth in the form of rare religious artifacts.

For each wealthy house:
  • Re-roll chance for dogs if there are no dogs
  • 50% chance of having a guard (d3 HD)
  • d4-1 (0-3) servants, employees, or apprentices
  • Each fighting-aged man has a 50/50 chance of having +d4 HD
  • ANY NON-GUARD WITH HD 3 OR MORE WILL HAVE A +1 WEAPON
Step Five:
Consult 1d100 names (printable link) and assign livelihoods commensurate with material wealth. Farmers, smiths, weavers, tailors, carters, cabinetmakers, potters, herdsmen, millers, wainwrights, carpenters, brewers, and stonesmasons are all staples of such towns. One can hold off on generating names for unimportant NPCs until asked.

Step Six:

Refer to my article on in-town factions and assign some villagers a faction. Five in six households have no interest in faction politics. Wealthy houses almost always do.

In Part II, I go over creating an Inn & Tavern. Click here to read it.

Saturday, June 27, 2020

So You Want to Run OSR: Part 2 - Running Your First Dungeon

This is the third in a series of articles dedicated to helping new OSR referees. You can read from the beginning here.

Last week, I went over preparing your first dungeon. This week, I'll cover running it, including tracking resources, tracking time, taking notes, mapping, exploring the dungeon, adventure hooks, and preparing for further sessions.

This advice will not cover what is typically already given in your ruleset of choice, to avoid redundancy.

The sheer volume of information may seem daunting, but remember that I am trying to be as thorough as possible to eliminate ambiguity. It is not complicated in practice. I have also attempted to outline the information in such a way as to respect the readers' time.

IMPORTANT: Please remember to use reaction rolls and morale checks during your first session. It is the most common mistake I see new referees make, to forget these rolls. Combat is very deadly, and when these rules are ignored, the dungeon becomes a tedious meat-grinder.

RESOURCES

Tracking resources and time is crucial to old-school style play, but new players are often suspicious of the task, if not outright averse to it. I recommend handing players a piece of scratch paper on which to track arrows, hit points, rations, and other consumables. It is easier to add a tally mark than it is to erase and re-write numbers on the character sheet. I recommend players write the resource they are tracking as well as the maximum number they can afford to expend, and using tally marks to indicate resources used. For example, Caliban the Fighter has six HP, four torches, and twenty arrows. On his scratch paper, he writes "HP [6], TORCHES [4], ARROWS [20]," with space for tally marks near each category. When he takes damage, uses an arrow, or spends time in the dungeon with his torch burning, he will make a mark on the paper. Since these resources don't affect his encumbrance enough to matter, he only needs to update his character sheet upon running out of the resource, returning to town, or ending the session. This will keep your character sheets cleaner for longer, save on erasing and re-writing, and generally make resource management less daunting. I know it sounds like a small change but in my experience it makes a difference, and I wouldn't be recommending it if it didn't.

 A simple resource tracking sheet.

NB: Typically, each "group" of tallies holds five tally marks, but since a torch lasts six turns, they are more likely to be counted off in groups of six. To remind yourself of this, you might want to put them on a separate line, or draw six-pointed stars with one stroke per turn rather than tally groups.

TIME TRACKING

As a referee, time tracking should be kept at scales of turns (within the dungeon), hours (small-scale overland travel), days (overland ("hexmap") travel), and even weeks, months, and years (downtime and tracking world events). Since this is our first session, we won't worry too much about keeping an entire world running in the background, and instead focus on a period of a few weeks while we get our bearings. Keep in mind, though, as your campaign expands, it will become necessary to track dates and events in order to create a more truthful world for your players to inhabit.

Find a clean sheet of paper and number it 1-30 for the days down each line (or however many days are in a month in your world), which is an appropriate time span for your first couple of sessions. Use this to keep track of events. For example, if I told my players (as outlined in last week's article,) that they were trying to haul as much treasure out of the dungeon in two weeks so that they could spend it on the Feast Day of St. Drotte, I would write "St. Drotte Feast Day" on line 14. As days pass, I will check off calendar days and resolve events as they pass. You may also add events to this calendar as your players explore the dungeon. Presume they find a wounded adventurer deep in the dungeon; you privately decide that if they don't bring him aid, he will die in two more days. Therefore, on the date two days from now, you write "adventurer dies if no aid brought," and if the players bring him aid before then, cross off or erase that note.

A month-long calendar. Click to enlarge.

I track my hours on a scratch sheet of paper, since they are simple tally marks and rarely have events attached to them that I cannot keep track of in my head, especially since the time frame is much shorter. I call this a Master Scratch Sheet, and I prepare one before every session.

NOTE TAKING

On the head of the sheet, I write "SESSION NOTES [real-life date]". Under that, I write the ingame date. The left side of the page, I jot laconic notes of what happens in-game. "Met kobolds in (3)," "Caliban steals guard's key in (5)." I circle room numbers so they stand out. If something happens that I need to remember for next session, for example, a character puts on a cursed ring, I will put a ">" in the margins in front of that entry. That way, when I review my notes as I prepare for the next session, I can scan down the margin of the page and have every important event that I need to remember stand out for me. Things that must be remembered for sessions further in the future are marked with a ">>" and added to my calendar.

On the top right side of the page, I write "MARCHING ORDER" and then the characters in their marching order (generally two-by-two, and if I quickly need them in one-by-one, I read left-to-right, top-to-bottom). This also lets me remember who is playing in which session, since I run an open table. Under this, I write TIME.

I assume the adventuring day begins at sunrise and ends at sunset (NB: I use a harsher wandering monster table for overland travel when the sun sets! Beware the bogeymen!). This will depend on your milieu (season, axial tilt, distance from equator) but typically I assume sunrise at 0600 and will begin the adventuring day at 0700, assuming that characters take about an hour to wake, eat, prepare spells, et c. To simplify travel time between civilization and adventuring site, instead of using wilderness travel rules, you might want to decide on some quick rules of thumb for encumbered/unencumbered and mounted/unmounted. For example, say it takes two hours on foot (three if carrying treasure or a heavy load), and one hour mounted (one and a half if mounted and carrying treasure or a heavy load). You may eschew rolling for encounters with the rationale that the lands are close enough to civilization that roving monsters are scarce, or you may decide to roll for encounters once on per trip on a one-in-twenty chance rather than a one-in-six. It is up to your discretion.

I write "0700" under TIME to remind myself the beginning of the adventuring day. Let's say my players walk to the dungeon without incident; I will write "0900" under that to note to myself that they arrived at the dungeon at 9 A.M. I will then begin to track turns using tally marks in groups of six. Every time I make a tally mark, I announce "time" to my players so that whoever is tracking torch usage can make another tally. I will also remind my players every hour, "You have spent X hours in the dungeon," as a courtesy. Since traveling overland in the dark is dangerous, sometimes players will elect to hole up in a deserted and defensible room in the dungeon and rest until the next morning.

In the space beneath the TIME section, I write MONSTERS and TREASURE, and keep track of monsters they have defeated and treasure they have recovered. This makes awarding XP at the end of the session simple. I do not bother with appraising treasure; otherwise, when a player asks me five sessions from now how much their bracelet is worth, I will not remember. I simply tell my players, "You find a bracelet worth about 100 silver" and they write it on their character sheets. Have your players keep track of their own treasure! I guarantee they will not slack on that front. I also have my players look after their mounts and hirelings, as well. Keep a shared "master list" of treasure they have stashed in their lodgings, as well, and periodically make a copy of it (I simply take a picture of it on my phone in case the sheet gets lost), or have your players keep a digital copy.

Session notes on a Master Scratch Sheet. Click to enlarge.

Keep your notes on what happened during the session simple and direct, and after the session, you may type them up in a more long-form manner. Remember to highlight anything that impacts your session prep for the next session, and add anything that must be remembered for a far-future session to your calendar.

MAPPING

Understanding how to give short, useful mapping instructions is crucial. Know what your mapper needs to know. Mapping can be divided generally into two major sections: rooms and hallways. Rooms are generally more complicated. These instructions will work for most roughly rectangular rooms and eliminate ambiguity. Odd room shapes will of course be more complicated. We will be describing the following room in this example:

Mapping a simple room. Click to enlarge.
  1. First describe where players enter from, and the length of the wall to either side of them. "(A) You enter from the west. (B) To your left, the wall runs north for twenty feet. (C) To the right, the wall runs south for ten feet."
  2. Then, give the overall dimensions. "The room is thirty feet west-east by forty feet north-south." If you establish with your players that you will always give W-E dimensions before N-S dimensions, you can shorten this - "The room is 30'x40'." 
  3. Then, give them exits they see. "(A) On the north wall, there is a door on the eastmost side. (B) On the east wall there is a door 20' south." (NB that "20' south" means there is 10 feet of wall between the door and the north wall, i.e. the door is "at" the 20' mark, not after it. This will keep things consistent with our hallway mapping instructions (cf.))
  4. Tell them where large items of interest are, if they care to place it on their map (e.g. statues, altars). "There is an altar in the southeast corner of the room."
In an oddly-shaped room, it may be more efficient to simply "walk" the player around the perimeter, like so:

"You enter from the west. Draw a wall that goes N 10', E 30', SE 20', S 10', W 20', S 10', W 20', N 10', W 10', and finally N 10'"

A rather oddly shaped room.

Players rarely care about the aesthetics of your map, and oddly-shaped rooms can bog down gameplay as first timers get comfortable giving and receiving mapping instructions, therefore use them sparingly.

Hallways are somewhat easier, but require you and your players agree on a convention. Hallways will generally have four major features: TURNS, BRANCHES, TEES, and CROSSES. Briefly go over this with your mapper and make sure they understand what is meant. When giving instructions from a junction, make sure your mapper understands that the instructions assume players are standing in the center of the junction (even if they are not, it is for the sake of consistency).

Mapping hallways. Click to enlarge. Note that turns and branches "take up" 10ft. while tees and crosses do not (as they terminate the hallway).

EXPLORING THE DUNGEON

As players explore your dungeon, put little check marks next to the rooms they explore and cross off enemies defeated or treasure taken. If you are using a PDF or a pre-written adventure you'd rather not mark up, use scratch paper instead. At the end of the session, place an indicator like a tally mark or star in the margin by each cleared room. Certain rooms will accumulate tally marks as they remain undisturbed, and once a room has three or four tally marks, you may decide to re-stock the room (which I will detail in a future article).

ADVENTURE HOOKS

As players explore the world, they will develop their own goals organically. Mages will seek powerful spells, fighters will gather retinues and conquer sites, and clerics will uncover holy artefacts. However, when presented with a truly open world, choices can be paralyzing for new players, especially those not used to "sandbox"-style games. Therefore, adventure hooks can be useful for signalling to players where fun, loot, and danger can be found.

Adventure hooks are an opportunity for you to get creative. Not every adventure hook needs to be an NPC sending the party on a "quest." Rumors about armies gathering, bandit raids on the town, treasure maps, a campsite with every inhabitant slaughtered and a mysterious symbol drawn in blood... these are just a few examples that will beckon your players. Don't worry about throwing too many at your players, if you follow the Golden Rule of Sandbox Refereeing, you will have time between sessions to prepare the adventure for them. For your first session, two or three adventure hooks will suffice. Perhaps a rumor in town, one in the dungeon, and one if players venture "off the beaten path." I would recommend tying your first adventure hooks to the dungeon, until you have fleshed out your milieu a little (detailed in future article "creating a hexmap").

PREPARING FOR YOUR NEXT SESSION

As your first session draws to a close, ask your players what their intentions are for the next session. Most likely, they will want to continue to explore the dungeon, although if you've thrown an interesting enough adventure hook at them, they may opt to pursue that instead. If your dungeon has distinct branches and wings, see if your players can decide on a specific area of the dungeon they are interested in exploring. In the intervening week, prepare what your players have indicated they will be doing, as well as fleshing out their home town a little more, should they decide to spend more time in it.

After everyone heads home, take a look at your session notes. I prefer to type up a slightly more in-depth session report while it is still fresh in my mind. Trust me, you will want to remember these sessions years down the line! One of my fondest moments was finding a folder full of old material while cleaning up.

I like to let time elapse in real-time between sessions, but I run weekly sessions, so if your sessions are less frequent, you may opt to only let a few days pass. Regardless, I like giving players some "offscreen" downtime to rest and heal up. Remember to check these days off on your calendar!

As you prepare your next session, refer to your session notes to see anything that you have indicated will be important for your next session. As I said, I like to mark anything that must be remembered for the next session with a ">" in the margins, and anything that should be added to the calendar with a ">>". Write down anything that you must remember to do in your next session at the top of a piece of paper and review it before sitting down for your next session. See the "month long calendar" and compare it to "session notes on a master scratch sheet."

Remember that the dungeon is not an entity frozen in time, waiting for the PCs to explore it. It is an ecosystem. Monsters will loot the corpses of their fallen comrades (and their fallen enemies). Factions' machinations will advance - the tension between two rival orc factions may boil over while PCs are resting in town, and they might be greeted by a room full of orc corpses upon their return after a particularly nasty argument comes to a head. Survivors of the PC's attacks will pack their belongings and flee the dungeon, or try to gather greater numbers to be ready for them next time. Gary Gygax famously "leveled-up" a group of Kobolds in Castle Greyhawk whenever they TPK'ed a convention group.

This sounds like a lot to keep track of, and it can be, which is why your calendar is invaluable. For example, in my first session, a pair of Kobolds fled from the PCs and scampered off into the woods. I noted on my calendar that after two weeks, they would return with the rest of their tribe for revenge. The surprise and delight on my players' faces when they recognized the two from earlier stands as a stark reminder of why I love this game. A living, breathing milieu is made of moments like these. Be attentive and arduous with your notes and time-tracking, and you will be rewarded with an experience that no other hobby can capture.

Do not allow yourself to become overwhelmed. Keep things simple and manageable, especially for your first few sessions. As you become more comfortable keeping track of this information, you will be able to add more.

In the next article, I will cover fleshing out your starting town.
Saturday, May 30, 2020

So You Want to Run OSR: Part 1 - Preparing Your First Dungeon

Last week, I covered the materials you will need for your first session of an OSR game. This week, we'll look at creating your first dungeon.

Per my advice given in "Golden Rule for Sandbox Refereeing," your first session should be spent on a simple dungeon crawl with some interesting adventure hooks that your players can follow up on in subsequent sessions. They will tell you which hook they want to pursue the following session (or if they'd rather just keep exploring the dungeon), and you spend the intervening time preparing it.

I would caution against spending too much time and effort coming up with a "back-story" or "lore" for your dungeon. I understand the urge, but remember that players rarely walk away from a session buzzing about the story you wrote; rather, players love and remember the stories they create. Information about a dungeon can be interesting and fun, and ideally it provides clues to the players about enemies, traps, and treasure that can be found within. For an obvious example, a crypt can be assumed to be full of undead, so clerics in the party would be a boon. Two or three sentences should be enough to give players an idea about the dungeon. Any further information I'd recommend giving to players via NPCs, to encourage interaction, whether this means interrogating factions in the dungeon or rolling for rumors in town.

The amount of rooms you will have to map and key for your first session will depend on how quickly your players explore the dungeon. You don't want to run out of content during a session, but you also don't need to create a 150-room dungeon in a week if your players only explore four or five rooms a session. I'd recommend at least 15 to 20 rooms keyed for your first session. Your dungeon should not be linear, so make sure that even the shortest route through your dungeon has enough content for a session. Gygax recommended keying the first three floors in advance of the first session, in case players wanted to pull a high-risk, high-reward dive to the lower levels.

Don't worry about a beautiful map; your players will probably not see it. Multiple entrances are a plus. Create a few loops and branches, and then connect certain rooms through sub-levels to make an interconnected dungeon. One-way doors and exits that reveal hidden entrances will also make things interesting.

Monsters, traps, treasure, and tricks.

About 1/3 of your rooms will contain monsters. Begin by creating factions (see my guide here). Some factions may be made of multiple kinds of monsters (if goblins and kobolds have an alliance, e.g.), while other factions may even be only one monster (a roaming ogre or a lost mage). Depending on the size of your dungeon, three or four factions per floor is probably sufficient. Some monsters may be unintelligent or otherwise unaffiliated, as well. Decide on each faction's "headquarters," where they gather, where their leader sleeps (and hides treasure!). Per the recommendation in B4, make sure you know what monsters will do should the PCs decide to attack, talk, or wait. REMEMBER TO USE REACTION ROLLS AND CHECK FOR MORALE! Forgetting to do so is a  common mistake new referees make.

In my opinion, it is more fun to interact with a trap you know about than find a trap you didn't know about. I like "Indiana Jones" style traps: it is obvious that there is a trap, but not exactly what it is or how to disarm it. A statuette on a plinth, dried blood on the floor, large cracks in the walls... players can poke around the environment to search for clues. A deceptively simple trap can still pose danger for even experienced players!

Stocking a dungeon can be a bit tricky. Using the treasure tables as given may be fairly "swingy." Think about it this way: players getting 500xp each per session will take 4 sessions to level up. This is a month of play, if you play once a week. Players will "lose" xp by dying or bringing along hirelings, as well. If you have 6 players, they'll have to recover 3,000gp of treasure per session to reach second level in a month. So how much treasure you put in your dungeon will depend on how fast you want your players to level up. Using the recommendations in Moldvay Basic, there is an average of about 255gp of nonmagical treasure per room on the first floor. Going off this, I'd recommend about 510gp per room on the second floor, 765gp per room on the third, and so on. This is on the lower end of what you'd probably want to stock, so don't hesitate to add some more treasure, especially if playing with a large group. Magical items can be rolled for as usual.

For mundane stocking, I'd refer you to Appendix I in the 1e AD&D DMG.

"Trick" is one of the most fun ways to stock your dungeon. Rather than rolling for something, I'd encourage you to truly let your imagination run wild. Don't be afraid to put in something bizarre. I keep a journal handy and write down anything that comes in my head, then pick my favorite ideas from it. Per Moldvay, these should come up about 1/6 times, but I like to keep them somewhat rarer - a few per floor. These also help players orient themselves in the dungeon, because the rooms stick out in their minds.

Some things to keep in mind:

When going for "Gygaxian naturalism," each faction should have a place to eat, sleep, store goods, store weapons and armor, prepare or cultivate food, hide treasure, convene, dispose of waste, quarter soldiers, house their chieftan, & c. I use Dwarf Fortress as inspiration.

Careful mapping should be rewarded. Symmetry and "missing rooms" can indicate where traps and secret doorways are.

Dungeons change! They grow and live. When players come back after time has passed, things should be different. If a character dies in the dungeon and their body is not recovered, it should be scavenged. Your players will be enraged and delighted to find that a goblin has pilfered the late Caliban's axe and is now using it against them. Have a section of your binder dedicated to tracking changes in a dungeon. Which rooms have been explored and must be restocked, what will happen if a faction is allowed to expand, & c.

Finding already-sprung traps and the long-decayed corpses of hapless adventurers can give players valuable information about what to be on the lookout for. A floor full of petrified adventurers is almost sure to contain a basilisk, and a chest surrounded by rotten bodies is best approached with a ten-foot pole.

You may want to put players on a clock, so to speak. This doesn't need to create much more work for you. To discourage the dreaded "five minute workday" where players show up to a dungeon, cast their spells, exhaust their resources, and then return home, for a first dungeon, I like to tell my players that there is a solstice festival in two weeks, and they will be spending their lucre on it. Therefore, all treasure they can acquire in those two weeks can be spent for bonus experience on the solstice day. This gives them a fun and concrete deadline. Of course, the dungeon can continue to be explored after this date, but it helps to use the players' own greed to draw them deeper into the dungeon.

Finally, create a rumor table that indicates features, danger, and traps. This encourages interaction with NPCs in town and factions within the dungeon. I don't like to include wholly false rumors; rather, all my false rumors have a grain of truth to them. The coven of blood-sucking vampires that the Goodman swears to have seen might actually be a swarm of blood-sucking stirges instead. The fearsome cockatrice might be a regular chicken, escaped from a kobold's pen. I like to overplay, rather than underplay danger in my false rumors.

Now you have everything you need to run your first session! I cover the details of running it in the next article, which you can read here.

Saturday, May 23, 2020

So You Want to Run OSR: Part 0 - Preparing for Your First Session

yea babey
So you've heard a lot about this whole 'OSR' thing and decided to give it a shot. You've chosen a rule set you like, and you're wondering where to begin. Begin here.

The scope of this article will cover the physical necessities for your first session. The next article will cover how to prepare your first dungeon. This article assumes that, per my advice offered in 'The Golden Rule of Sandbox Refereeing,' your first session will be a simple dungeon-delve. No need to create an entire milieu just yet.

A disclaimer: this is how I choose to run my games, and what works for me. Other approaches may differ. This is fine. I am not the final authority. If it works for you, use it. If it doesn't, ignore it. Games are fun, so have fun.

To begin, here is a checklist of what you will need at your first session. I will elaborate on what is needed and why after the checklist.
  • The obvious: pencils and erasers, dice, your ruleset of choice.
  • A running list of things you wish you had at your table.
  • A DM screen with appropriate reference sheets.
  • A three-ring binder, preferably with dividers and inserts. Can double as a DM screen in a pinch.
  • Extra character sheets, or notebook paper and a "master character sheet" for your players to copy
  • A guide on rolling new characters (enough copies to distribute to your players)
  • A list of first-level Magic-User and Elf spells (as well as first-level Cleric spells if you allow your Clerics to cast spells at first level)
  • Bookmarks if using physical rulebooks
  • A running list of important things to remind yourself for next session
  • A town
  • A dungeon
Pencils, erasers, dice, ruleset, graph paper:

Enough to go around. Cheap enough you don't mind if your players walk off with them or lose them under the table. Have a sharpener handy as well if they're not mechanical. I found that players were burning through the erasers on their pencils faster than their lead, so I had a rubber eraser for people to use. For players, one to three d6 dice, a d4, a d8, one to two d10s and a d20 are sufficient. For you, the DM, I'd recommend two to three d4 dice, three d6, three d8, two d10, and a d20. A d12 is optional as well. For graph paper, I prefer four hexes per inch, with a three-hole punch so that I can keep them in my binder.

A running list of things you wish you had at your table:

During your first session, you'll find yourself scrambling for something you wish you had on you. Keep a list handy to remind yourself next time.

A DM screen with appropriate reference sheets:

You don't need to be fancy. The screen is more for the reference sheets than for secrecy. Really, the only things that need to be rolled in secret are listen checks and some thief skills.

On the outside of my screen are player-facing reminders: cleric turn undead tables and equipment costs and weights.

On the inside of your screen you might want:
  • Combat matrices
  • The combat sequence, including reaction rolls
  • Rules for evasion and pursuit
  • Wandering monster tables
  • Saving throws
A three-ring binder:

You may set this up how you see fit. I like to have a section for calendars, a section for my hexmap and key, a section for the dungeon map and key, useful random tables, and then scratch paper.

Extra character sheets or notebook paper:

For your first session, I recommend having twice as many characters pre-generated as you have players (or half that if your players are generating their own characters). The nice thing about OSR games is that character sheets are very simple, so players can also write their own character sheets on notebook paper as well. Just have a master character sheet they can copy from. I prefer to write anything that doesn't change in pen, and fill it in with pencil afterward.

A guide for rolling new characters:

Have enough guides so that your players can each have one, if you're generating characters at the table. Otherwise, one that can be passed around is fine. Walk them through the process of character creation, including:
  1. Rolling for stats
  2. Choosing a class and adjusting stats if applicable
  3. Recording adjustments
  4. Rolling and recording hitpoints
  5. Recording XP, prime requisite adjustment percentage, saving throws, and to-hit matrices
  6. Rolling for starting money
  7. Purchasing equipment
  8. Recording armor class, damage dice, and encumbrance and moving speed
  9. Recording any special abilities
A list of first-level magic-user spells (and cleric spells if you allow clerics to cast spells at first level):

It may be useful to write these on notebook cards, so that magic-users may have their spells handy as a reminder.

Bookmarks if using physical rulebooks:

Keep track of which pages you reference frequently; it may be beneficial to copy this information onto your screen. If you use a PDF program for your rules or modules, use the 'bookmark' or 'favorite' function. 

A running list of things to remind yourself for next session:

Keeping a calendar is a great idea, but for your first session, a pad of paper where you write reminders for yourself will do. For example, if your players let a few kobolds escape, perhaps next session they come across their camp on the way to the dungeon.

A town

For your first session, your town is little more than a place to rest and re-stock. Come up with the names of a tavern (to get rumors and hire people), an inn (to sleep and store belongings), a sanctuary (to purchase healing and restorative services), a shop and smithy (to purchase equipment and weapons), and a stable (to purchase mounts). Name the owners of each establishment and have a few random names on hand as well.

A dungeon

See the next part of this series.

Tuesday, May 5, 2020

Fuliginous Souls: Dark Souls OSR hack notes

Something to keep me busy. Nothing is playtested.

https://docs.google.com/document/d/1R_rgnf9bOkcbhTRQ_o1cJxQsbmyE_0aFGpiH5nzDg9A/edit?usp=sharing

Check the link for updates. Content:

Classes:
Knight - All armor and shields. Highest HD. Bonus to saving throws vs. poison.
Bandit - Light armor, no shields. Deal max damage on criticals. Bonus to all saving throws.
Sorcerer - No armor or shields. Cast offensive spells (sorcery). Bonus to saving throws vs. magic.
Priest - Medium armor and shields. Cast defensive spells (miracles). Bonus to saving throws vs. curse.
[Deprived - No abilities. No armor, no shield, any weapon. Half xp requirements?]

THAC0 = 20 - your HD - STR if knight or bandit AND wielding heavy/med weapon OR DEX if knight or bandit AND wielding ranged or med/light weapon - enchantments on weapon

ITEMS:
Pyromancer’s glove: cast offensive and defensive spells at cost of Souls (XP)
Estus Flask: Once per day, heal 1d6+1 HP. Upgrade with estus shards (add to health gained) or firekeeper souls (add to times per day). Quaffing takes 1rnd.
Titanite: Exchange titanite + souls at a Giantsmith to upgrade weapons or armor.

Stats (3d6, arrange to taste or 4d6 drop lowest swap two?):
STR: Affects carrying capacity, melee to-hit and melee damage with heavy weapons IF knight or bandit.
DEX: Affects AC and ranged to-hit and melee damage with light weapons IF knight or bandit.
VTL: Vitality. Affects HP. On a -1/+1 scale rather than -3/+3.
INT: Affects attunement slots (if higher than FTH) and sorcery
FTH: Faith. Affects attunement slots (if higher than INT) and miracles
HTY: Humanity. All saves are d20 at or over humanity. Save vs. going Hollow is 3d6 roll under. NO CLASS provides a bonus to saves vs. going Hollow (cf.) Also affects reaction rolls.

Hitpoints:
Each level you gain, roll your level in HD (D6). If total is higher than previous HP, that is your new HP total. If it is not, gain 1 HP instead. KNIGHT, roll Xd6+X every level. CLERIC AND BANDIT, roll Xd6 2 out of every 3 levels. SORCERER, roll Xd6 every two levels.

GOING HOLLOW:
When you reach 0 HP, you die. To prevent going hollow, roll 3D6. If you roll UNDER your current HTY score, your soul returns to the nearest bonfire. You may return to unlife. However, your HTY is now the total you rolled. You are also CURSED. If you roll AT or OVER your HTY score, you have gone Hollow. Your corpse immediately raises as Hollow and attacks the nearest non-hollow mindlessly on a 2-in-6. Otherwise, docile Hollow.

BONFIRES:
Rest at a bonfire for 24hrs. to refill health and restore spells. Estus flasks refill. All treasure incl. currency may be fed to the fire and returned as Souls. OR sell in town and get ½ value back as currency. DOES NOT CURE CURSE. May travel FROM certain bonfires TO any other bonfire previously attuned to?

SOULS:
XP. You may not spend so much that you level down. However, you do not have to level up upon reaching a breakpoint. You may only level up once per rest at bonfire. Knights need 2k souls to level, doubled as B/X. Sorcerers need 2.5k, Priests 1.5k, Bandits merely 1.2k.

CURRENCY:
1 copper = 1 aes = .1 xp
1 silver = 1 orichalk / 10 aes = 1 xp
1 electrum = 1 bit / 5 orichalks = 5 xp
1 gold = 1 asimi / 10 orichalks = 10 xp
1 platinum = 1 chrisos / 5 asimi = 50 xp

Begin with 3d6 x 100 orichalks. Keep costs for mundane equipment in asimi. If adapting from module, DND platinum = bits, gold = orichalks, silver = aes, copper/10 = aes, electrum/10 = bits (“silver standard”)

ENCUMBRANCE:
STONES of encumbrance. 1/3ST = 50cn.
“Flip-roll” = 3st or less
“Fast-roll” = 3.3st - 6st
“Medium-roll” = 6.3-9 st
“Fat-roll” = 9.3 - 12st

Players may ROLL away from an attack by rolling OVER their encumbrance (rounded UP) with a d12. Negates damage. Multiple attacks must be rolled for multiple times. If they fail, attack succeeds (no need to roll to-hit).

HUMANITY:
Rare treasure (magic item table). Consume one to add +1d4 to humanity (max 18), fully heal, and break CURSE. Immediately gain souls equal to your HD squared x 1,000.

CURSE:
Your max HP is HALVED. Does NOT stack.

Upon reaching max humanity, you may retire as a firekeeper.
HD 1-3: Small bonfire.
HD 4-6: Medium bonfire. +1 estus flask while resting at it. May travel to any bonfire from here.
HD 7-9: Enormous bonfire. +2 estus flask while resting, may travel to any bonfire from here, and from any bonfire to here. Towns typically spring up around these.
If firekeeper is killed, fire goes out. Firekeeper drops firekeeper soul. (Small, medium, or enormous as per bonfire size: +1 or +2 estus if M or E.)

Weapons:
BLADES are most common and do max dmg on 20 (stab).
AXES deal “leftover” damage to adjacent targets after killing one.
MACES +2 to-hit vs. plate or otherwise heavily armored opponents.
POLEARMS may attack from second rank.

BANDITS deal max damage on 20 (1-3), 18-20 (4-6), 16-20 (7-9)

KNIGHTS may roll HD, any 5 or 6 scores one “hit” vs. swarms (4 dmg or kill 1 1HD creature. 2 hits 8 dmg or kill 1 2HD creature, etc.) “Cleave.”

ATT slots = FTH or INT bonus + ½ levels in Priest (round down, 0 at level 1) or levels in Sorcerer

ENCHANTMENTS:
Crystal: add INT bonus to to-hit and damage. Shatters on a 1.
Holy: add FTH bonus to to-hit and damage.
Normal: add +X to to-hit and damage.
Lightning: add +X to to-hit
Fire: add +X to damage
Chaos: add HTY bonus (or 1d6?) to to-hit and damage.

S1: The Undead Parish
S2: Darkroot Forest + The Tower of Havel
S3: Blighttown (hexcrawl)
S4: Anor Londo (CISO-inspired?)
    S5: Tomb of Giants
    S6: New Londo Ruins
    S7: Lost Izalith
    S8: Kiln of the First Flame

ORNSTEIN 4HD+4, AC 2, 1 attack (d8) as 6HD due to Lightning enchantment, Mv 120/40, Save as F4, ML 10 / takes 2x dam from Fire, ½ dam from lightning
SMOUGH 8HD+8, AC 5, 1 attack (d12+3 due to Fire enchantment), MV 90/30, Save as F8, ML 10 / takes 2x dam from Lightning, 1/2 dam from fire

Friday, May 1, 2020

OSR FAQ

>Just what the hell is 'OSR' anyway?
A: OSR stands for Old-School Renaissance (or Revival, depending on who you ask.) Over the last 40 years, the game we refer to as "Dungeons and Dragons" has changed so much that its initial inception is essentially an entirely different game from its current form. The OSR is for people who enjoy that early style of play.

>Why is "Old-School" D&D so much better?
A: It's not "better," it's just a very different game. If you ask 100 different OSR enthusiasts why they prefer OSR, you'll get 100 different answers. Common answers include an increased emphasis on player agency and sandbox environments, a more grounded power curve, an emphasis on player skill rather than rules mastery, simple rules, quick character generation, easier DM prep, and more challenging, lethal gameplay.

>I thought Old-School D&D was complicated, and only the groggiest of nards could understand its arcane rules?
A: AD&D 1st edition is famous for its crunchy and sometimes byzantine rules, but B/X, OD&D, and their derived systems couldn't be simpler. As the writer of this document I can tell you I've had people who have never played D&D before rolling dice and exploring dungeons alongside veteran players within 5 minutes, and that's not an exaggeration.

>So many editions! I wouldn't even know which one to start with...
A: At a certain point, it becomes a question of which shade of white paint is your favorite. The "OSR" places an emphasis on compatibility: we want to be able to run a module in our preferred ruleset, whichever that may be, so the difference between rulesets is fairly minimal. For a first-timer coming into the scene totally cold, the author of this document (TAOTD) would recommend "Old-School Essentials," by Necrotic Gnome. Its SRD is available online in wiki form totally free. It is essentially a re-printing of the 1980's "Basic/Expert" D&D (AKA "B/X D&D") which was itself a simplification of AD&D, a parallel product. B/X D&D is the foundation of most retroclones and hacks, and 99% of modules can be run using B/X with minimal to no conversion.

>I think I might like to play OSR, but I'd want to change some stuff about it first...
A: One of the best things about the OSR is its infinitely hackable rules. House rules were the expectation, acknowledged many times in the official rulebooks. However, TAOTD would recommend playing at least a few sessions as "by the book" as possible. Often rules that seem silly or incongruous will justify themselves in play.

>Alright, I've got my ruleset chosen. Now what modules do you recommend?
A: A helpful anon of the /osrg/ has compiled a .pdf of recommended introductory modules; ask after it in the /osrg/. As of May 2020, its latest version is 1.6. TAOTD recommends either B2 - Keep on the Borderlands or B4 - The Lost City.

>I want to play OSR, but my players want to stick with 5e/3.PF...
A: Ask them to run a module as a one-shot. They'll fall in love before they know what's happening :)

Friday, April 24, 2020

Session Report 4/17/2020: The Ring of Kamorhaz


The Ring of Kamorhaz.
Persons mentioned in the text:
    • BOCCE, a level 1 Barbarian
    • ROBERT, a level 1 Fighter
    • KYLE, a level 4 Halfing; a hero of the Battle of Fennburgh, horribly disfigured by frostbite
    • ORION, a level 1 Elf
    • ERIC, a level 1 Cleric of St. Bartholomew the Just
    • ARMAND, a level 4 Cleric; a hero of the Battle of Fennburgh
    • BILL, a level 1 Fighter
    The time:
        11 Bloodstone 1120 Anno Daedalus


    THE PLACE:
        A shrine to the ancestor spirit ROLLO THE STRONG, near TRISKELE, capital city of the frozen hinterlands known as the THUNDERMOOR

        Our Heroes set out again for the shrine, determined to finish their map and loot whatever treasure that could be found from the northeast wing. When they crested the dell in which the shrine sat, they saw two small camps situated near the fire. As Our Heroes approached, they heard the short blast of warning horns and a representative from each camp rode up to meet them.

        One representative introduced himself as a member of the Black Owl clan; the other, a member of the Red Elk clan. The Black Owls had heard about the shrine and wanted to take it over for their ancestor spirit, Haetha, but the Red Elks had also been alerted to the shrine’s presence, and wanted to protect and restore it, as they also feted the ancestor spirit of Rollo the Strong. However, the strong presence of undead in the shrine made both camps nervous about clearing it out themselves. Both of the men wanted to know what Our Heroes aimed to do with the shrine.

        Our Heroes explained that they were simply explorers, come to map out the shrine, and keep whatever they found. The Red Elks bristled at this; they believed whatever treasure was in the shrine was left as an offer to Rollo the Strong, and wanted it undisturbed. The Black Owls decided a map would be useful, and offered two of their finest destriers for an accurate map. The Red Elks counter-offered with two mounts of their own, as well as some fine hides got from a hunt. Our Heroes excused themselves to mull the offers over.

        Our Heroes decided to play the clans against one another, separating them and privately promising each a map. The plan was, after fully mapping the shrine, to rendezvous with a representative on the opposite side of the shrines, out of sight of one another, and abscond with their reward before either clan realized what was happening. They explained the need for a rendezvous point to each representative in private: they were worried the other clan would come after them if they knew they had decided to sell the map to their rival clan. The representatives agreed, but there was still the matter of treasure: the Black Owls wanted a hefty cut of whatever Our Heroes found in the shrine, and the Red Elks wanted Our Heroes to leave it undisturbed, period. Our Heroes agreed to have their bags searched before entering and after exiting the shrine, privately planning to hide whatever treasure they found and come back later to collect it.

        The clan representatives stood aside and allowed Our Heroes to pass. Upon entering the shrine, Our Heroes went to the center room, where they found some Critterlings re-building the plinth of the shrine. Our Heroes followed the Critterlings back to their dormitory to speak with the Critterling leader, asking them about the northeast section of the shrine. The Critterling leader said that the acolytes of Rollo lived in the wing to the northeast, and that although the door was locked, it was probable that an acolyte would pass through. To show their gratitude for clearing out the Fleshrippers the week before, the Critterlings also showed Our Heroes the engraving in the Critterling leader’s private room, which Our Heroes had not yet seen. It was a simple engraving, of Rollo the Strong using a greatbow to slay a giant, but it was brilliantly rendered. Our Heroes thanked the Critterlings and moved along to the northeast wing.

        Outside of the entrance to the acolytes’ wing, five Zombies were shuffling around. Armand pushed his way to the front of the group and called forth a wave of divine energy that obliterated the undead. As the remains lay smouldering, the door creaked open and a timid acolyte peeked out to see what happened. Kyle assuaged his fears and told him that they were a group of cartographers come to map the shrine. Although Kyle’s monstrous appearance frightened the acolyte, Kyle’s tales of how he accrued his battle-scars impressed him. The acolyte introduced himself as Zagreus, and invited Our Heroes into the sitting-room to talk more. The sitting-room was adjacent to the dormitories, as well as a stockpile of food and a prayer room. Our Heroes took turns telling Zagreus about their adventures as he listened raptly.

        With Zagreus sufficiently impressed, Kyle asked if he wouldn’t mind telling them about the layout of the acolytes’ wing, so they could complete their map. Zagreus agreed, and told them about the dormitories, stockpiles, and prayer room, but Kyle privately noticed that there was a small, 10’x10’ room unaccounted for southeast of the stockpiles. Bob offered some rations to Zagreus, to store for the other acolytes, and Zagreus was grateful, and offered to accompany him to the stockpiles. While in the store-room, Bob noticed that there was a large larder in the southeast that Zagreus seemed to want to steer Bob away from.

        When Bob and Zagreus returned to the acolytes’ sitting-room where the others were, Kyle asked Zagreus to show him his dormitory. Zagreus agreed, on the condition they were very quiet, so they didn’t wake the other acolytes. When Zagreus let them in, Kyle distracted him while Bob slipped away. Bob headed back to the store-room and pushed the larder aside, revealing a small hidey-hole filled with treasure: some silver, holy water, and a mummified hand with a bizarre ring on it. Bob pushed the silver into his bag and destroyed the hand, and then slipped the ring onto his own finger, where it stuck fast. He put his glove back on, covering the ring, intending to walk out with it on.

        As Bob pushed the larder back into place, it made a noise, which startled Zagreus. Kyle leapt onto Zagreus’ back and wrapped him in a headlock, choking him until he passed out. Bocce volunteered to watch over Zagreus’ unconscious body while the others poked around, in case Zagreus came to. Immediately after the others left, Bocce cut Zagreus’ throat. Our Heroes found nothing else of interest in the acolytes’ wing, and decided to leave. They split the silver they had found among one another’s bags to disguise it from the clansmen as they left, figuring they wouldn’t notice an additional 20 silver each, as they had hefted their coin rather than counted it.

        Their plan worked, and Our Heroes rode away with new mounts, some fine hides, and a wondrous ring that pulsated on Bob’s hand, throbbing with a great and terrible energy...


    A Treatise on Traps

     This post is available in video form on my YouTube channel (opens in a new window).       Click to enlarge     Here is a simple 3d6 table t...